- Free Online Auto Repair Manuals and Wiring Diagrams
- repair manuals | workshop manuals | service manuals | repair guides | online councils | pdf download | wiring diagrams
- Free Opel Repair Manuals
- Privacy Overview
- OPEL MOKKA X 2017 Repair Manual
- Page 62 of 247
- Page 63 of 247
- Page 64 of 247
- Page 65 of 247
- Page 66 of 247
- Page 67 of 247
- Page 68 of 247
- Page 69 of 247
- Page 70 of 247
- Free Online Auto Repair Manuals and Wiring Diagrams
- repair manuals | workshop manuals | service manuals | repair guides | online councils | pdf download | wiring diagrams
- Opel Mokka Repair Manuals
Free Online Auto Repair Manuals and Wiring Diagrams
repair manuals | workshop manuals | service manuals | repair guides | online councils | pdf download | wiring diagrams
Free Opel Repair Manuals
Free Opel repair manuals [pdf] for do-it-yourselfers.
The most complete guide to free oline auto repair manuals and free auto repair diagrams on the web.
This website uses cookies
We use cookies on our website to give you the most relevant experience by remembering your preferences and repeat visits. By clicking “Accept”, you consent to the use of ALL the cookies.
Privacy Overview
This website uses cookies to improve your experience while you navigate through the website. Out of these, the cookies that are categorized as necessary are stored on your browser as they are essential for the working of basic functionalities of the website. We also use third-party cookies that help us analyze and understand how you use this website. These cookies will be stored in your browser only with your consent. You also have the option to opt-out of these cookies. But opting out of some of these cookies may affect your browsing experience.
Necessary cookies are absolutely essential for the website to function properly. This category only includes cookies that ensures basic functionalities and security features of the website. These cookies do not store any personal information.
Any cookies that may not be particularly necessary for the website to function and is used specifically to collect user personal data via analytics, ads, other embedded contents are termed as non-necessary cookies. It is mandatory to procure user consent prior to running these cookies on your website.
OPEL MOKKA X 2017 Repair Manual
Storage59StorageStorage compartments. 59
Glovebox . 59
Cupholders . 59
Front storage . 60
Sunglasses storage . 60
Underseat storage . 61
Centre console storage . 61
Rear carrier system . 61
Load compartment . 71
Load compartment cover . 73
Rear floor storage cover . 73
Lashing eyes . 73
Warning triangle . 73
First aid kit . 74
Roof rack system . 74
Roof rack . 74
Loading information . 74Storage compartments9Warning
Do not store heavy or sharp
objects in the storage
compartments. Otherwise, the
storage compartment lid could
open and vehicle occupants could be injured by objects being thrown
around in the event of hard
braking, a sudden change in
direction or an accident.
Glovebox
To open, pull the handle.
The glovebox should be closed while
driving.
Cupholders
The cupholders are located in the
centre console and rear part of the
centre console.
Page 62 of 247
60Storage
To use the rear seat cupholder, pull
the strap in the rear seat armrest.
Front storage
A storage compartment is located
next to the steering wheel. Pull the
handle to open.
A further storage compartment is
located in the centre console.
To open, press the button.
The covers of the storage
compartments should be closed while
driving.
Sunglasses storage
Fold down and open.
Do not use for storing heavy objects.
Page 63 of 247
Storage61Underseat storage
Lift drawer at the front and pull out. Toclose, push the drawer in and
engage.
Centre console storage
Push down the button and slide cover backwards.
Rear carrier system
Rear carrier system for three
bicycles
The rear carrier system (Flex-Fix
system) allows one bicycle to be attached to an extendable carrier
integrated into the vehicle floor. It is
possible to attach two further bicycles
on an adapter. The transportation of
other objects is not permitted.
The maximum load of the rear carrier
system is 60 kg with attached adapter and 30 kg without attached adapter.This allows the attachment of an
electrically-powered bicycle to the
Page 64 of 247
62Storagerear carrier system. The maximumload per bicycle on the adapter is
20 kg.
The wheelbase of a bicycle must not
exceed 1.15 metres. Otherwise the
secure fastening of a bicycle is not
possible.
If not in use, the rear carrier system
must be slid back into the vehicle
floor.
There must not be any objects on the bicycles that could become loose
during transportation.Caution
If the rear carrier system is
extended and the vehicle is fully
loaded, the ground clearance will
be reduced.
Drive carefully whenever the road
has a steep inclination or when
driving over a ramp, bump, etc.
Caution
Consult your bicycle dealer before
attaching bicycles with carbon
frames. The bicycles may get
damaged.
Note
The tail lights of the vehicle will be
deactivated if the tail lights of the rear carrier system are installed.
Extending
Open the tailgate.
9 Warning
No-one should be in the extension
zone of the rear carrier system,
risk of injury.
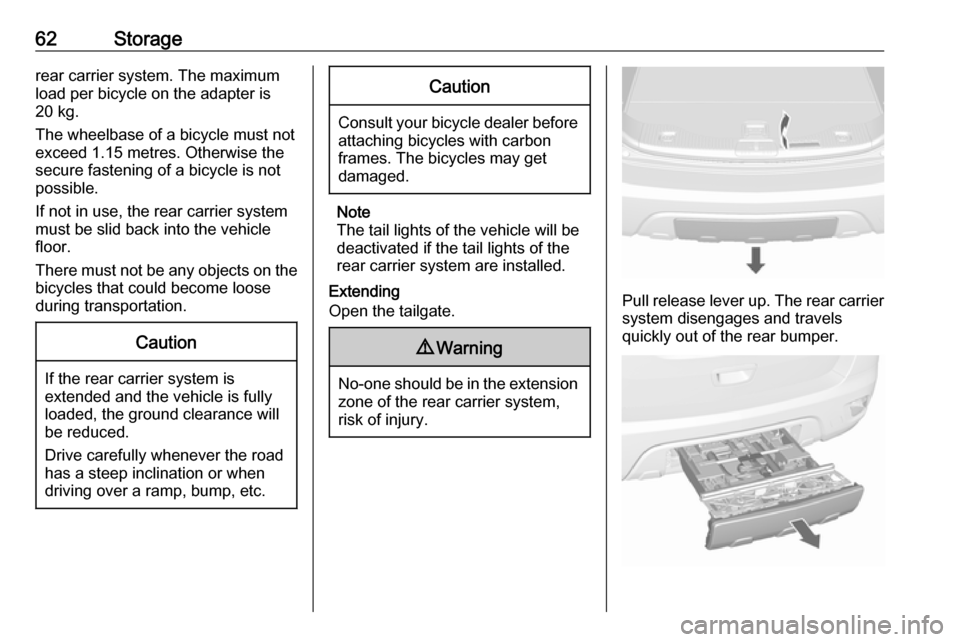
Pull release lever up. The rear carrier system disengages and travels
quickly out of the rear bumper.
Page 65 of 247
Storage63Completely pull out the rear carrier
system until you hear it engage.
Ensure that it is not possible to push in the rear carrier system without
pulling the release lever again.9 Warning
It is only permissible to fit objects
to the rear carrier system if the
system has been correctly
engaged. If the rear carrier system
will not engage correctly, do not fit
objects to the system and slide the system back. Seek the assistance
of a workshop.
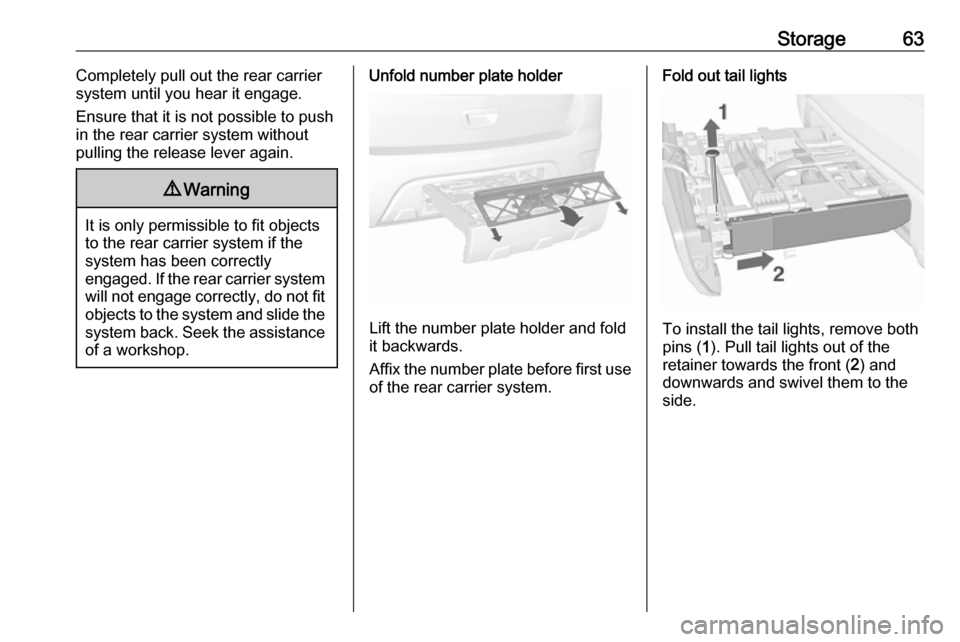
Unfold number plate holder
Lift the number plate holder and fold
it backwards.
Affix the number plate before first use of the rear carrier system.
Fold out tail lights
To install the tail lights, remove both
pins ( 1). Pull tail lights out of the
retainer towards the front ( 2) and
downwards and swivel them to the
side.
Page 66 of 247
64Storage
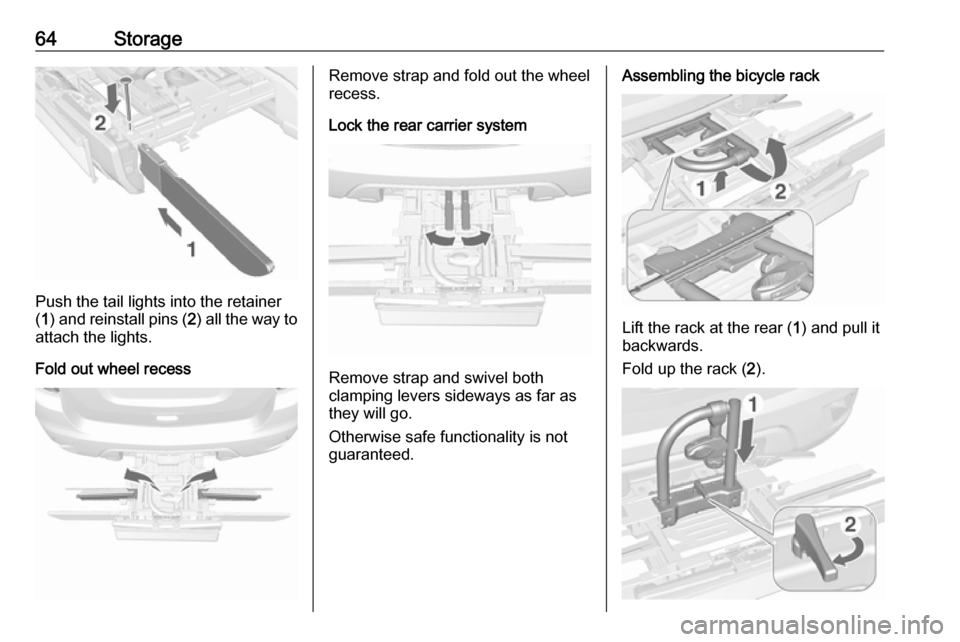
Push the tail lights into the retainer
( 1 ) and reinstall pins ( 2) all the way to
attach the lights.
Fold out wheel recess
Remove strap and fold out the wheel
recess.
Lock the rear carrier system
Remove strap and swivel both
clamping levers sideways as far as
they will go.
Otherwise safe functionality is not
guaranteed.
Assembling the bicycle rack
Lift the rack at the rear ( 1) and pull it
backwards.
Fold up the rack ( 2).
Page 67 of 247
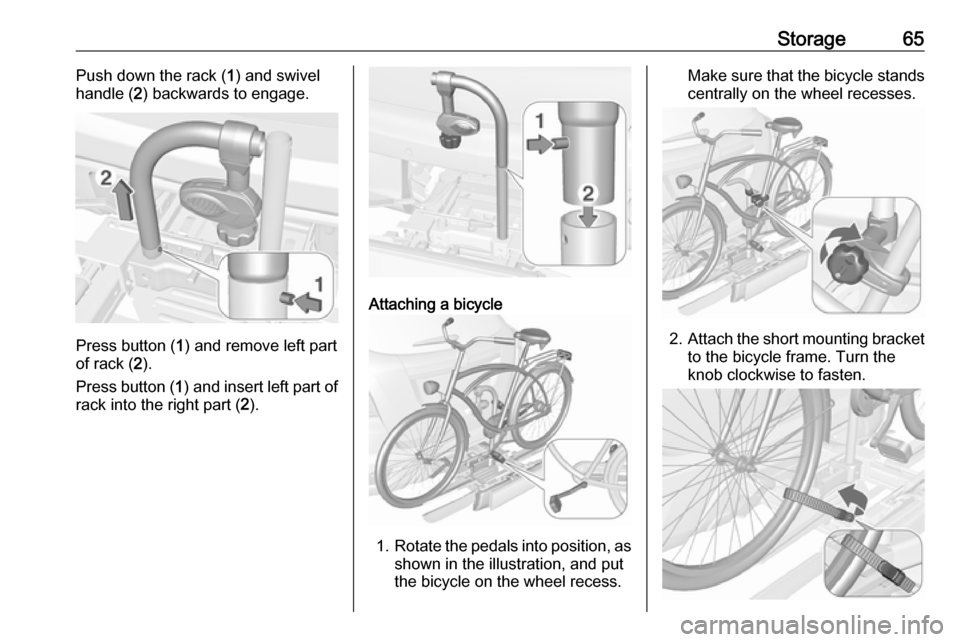
Storage65Push down the rack (1) and swivel
handle ( 2) backwards to engage.
Press button ( 1) and remove left part
of rack ( 2).
Press button ( 1) and insert left part of
rack into the right part ( 2).
Attaching a bicycle
1. Rotate the pedals into position, as
shown in the illustration, and put
the bicycle on the wheel recess.
Make sure that the bicycle stands centrally on the wheel recesses.
2. Attach the short mounting bracket
to the bicycle frame. Turn the
knob clockwise to fasten.
Page 68 of 247
66Storage3.Secure both bicycle wheels to the
wheel recesses using the strap
retainers.
4. Check the bicycle to make sure it is secure.Caution
Ensure gap between bicycle and
vehicle is at least 5 cm. If
necessary, loosen handlebar and swivel sideways.
Attaching the adapter
When carrying more than one bicycle, the adapter must be fixed.
1. Apply the adapter to the rear carrier system, as shown in the
illustration.
2. Turn the lever ( 1) forwards and
hold it, then lower the adapter ( 2)
at the rear.
3. Release lever and check if the adapter is engaged securely.
4. Guide the strap attached to the adapter underneath the lever
when folding back the rear carrier system. Fasten the strap.
Attaching further bicycles
The attachment of further bicycles is
similar to the attachment of the first
bicycle. Additionally, some steps
must be considered:
1. Before putting on the bicycle, always unfold the wheel recesses
for the next bicycle if necessary.
2. Always rotate the pedals into an appropriate position before
putting on the bicycle.
Page 69 of 247
Storage67
3. Position the bicycles on the rearcarrier system alternately aligned
to the left and to the right.
4. Align the bicycles with the one attached previously. The wheel
hubs of the bicycles must not
touch each other.
5. Attach the bicycles with mounting brackets and strap retainers as
described for the first bicycle. The
mounting brackets should be
fixed in parallel.
Use the long mounting bracket to
attach the second bicycle to the
rack.Use the short accessory mounting
bracket to attach the third bicycle. The bracket must be fixed
between the frames of the second and third bicycle.
6. Additionally, secure both bicycle wheels of the third bicycle to the
wheel recesses using the
tensioning straps.
It is recommended to attach a
warning sign to the rearmost bicycle,
to increase visibility.
Fold the rear carrier system
backwards
The rear carrier system can be folded
backwards to gain access to the load compartment.
● Without attached adapter:
Push the lever ( 1) to disengage
and hold it.
Page 70 of 247
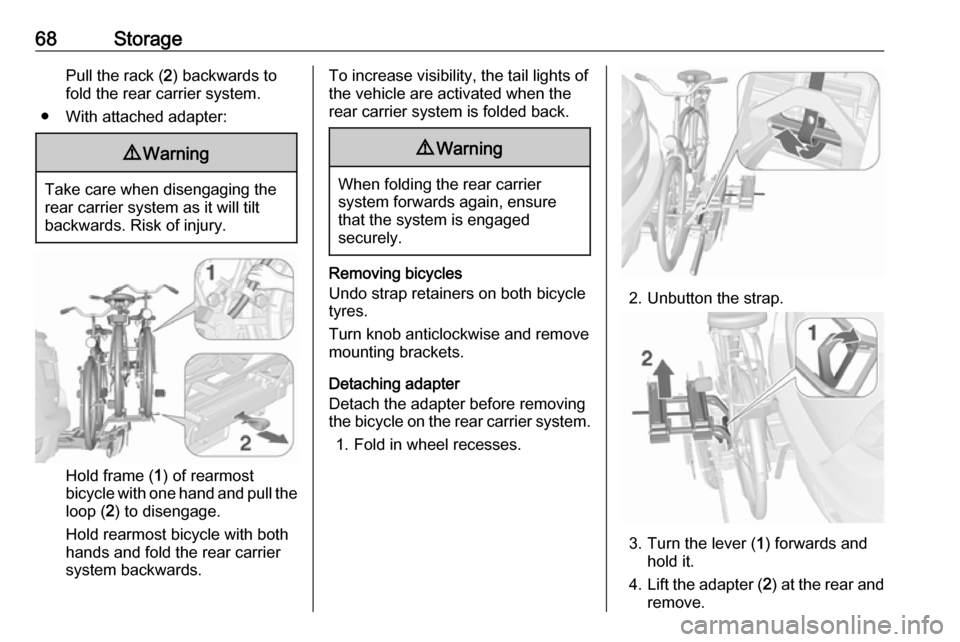
68StoragePull the rack (2) backwards to
fold the rear carrier system.
● With attached adapter:9 Warning
Take care when disengaging the
rear carrier system as it will tilt
backwards. Risk of injury.
Hold frame ( 1) of rearmost
bicycle with one hand and pull the
loop ( 2) to disengage.
Hold rearmost bicycle with both
hands and fold the rear carrier
system backwards.
To increase visibility, the tail lights of
the vehicle are activated when the
rear carrier system is folded back.9 Warning
When folding the rear carrier
system forwards again, ensure
that the system is engaged
securely.
Removing bicycles
Undo strap retainers on both bicycle
tyres.
Turn knob anticlockwise and remove
mounting brackets.
Detaching adapter
Detach the adapter before removing
the bicycle on the rear carrier system.
1. Fold in wheel recesses.
2. Unbutton the strap.
3. Turn the lever ( 1) forwards and
hold it.
4. Lift the adapter ( 2) at the rear and
remove.
Free Online Auto Repair Manuals and Wiring Diagrams
repair manuals | workshop manuals | service manuals | repair guides | online councils | pdf download | wiring diagrams
Opel Mokka Repair Manuals
Free Opel Mokka repair manuals [pdf] for do-it-yourselfers. Content: general information; maintenance; common specs & procedures; DTC index (trouble codes); accessories & equipment; body & frame; brakes; driveline/axles; electrical; wiring diagrams; engine; engine performance; HVAC; lighting; restraints; steering; suspension; transmission.
 The Opel Mokka was introduced in 2012. Technical specs: Class: subcompact crossover sport utility vehicle; Body style: 5-door sport utility vehicle; Layout: front-engine, front-wheel drive or intelligent four-wheel-drive; Wheelbase: 100.6 in (2,555 mm); Length: 168.5 in (4,280 mm); Width: 69.9 in (1,775 mm); Height: 64.8 in (1,646 mm); Engines: 1.4L A14NET VVT MPI Turbo I4 produced 138 hp (103 kW) at 4,900-6,000 rpm and 148 lb·ft (200 N·m) at 1,850-4,900 rpm, 1.4L B14XFT VVT DI Turbo I4 produced 150 hp (112 kW) at 4,900-6,000 rpm and 173 lb·ft (235 N·m) at 1,850-4,900 rpm, 1.6L A16XER VVT MPI I4 produced 113 hp (85 kW) at 6,200 rpm and 114 lb·ft (155 N·m) at 4,000 rpm, 1.8L A18XER VVT MPI I4 produced 138 hp (103 kW) at 6,200 rpm and 131 lb·ft (178 N·m) at 3,800 rpm, 1.6L B16DTN CDTI ecoFLEX I4 produced 108 hp (81 kW) at 4,000 rpm rpm and 221 lb·ft (300 N·m) at 2,000-2,250 rpm, 1.6L B16DTH CDTI Turbo ecoFLEX I4 produced 134 hp (100 kW) at 3,500-4,000 rpm and 236 lb·ft (320 N·m) at 2,000-2,250 rpm, 1.7L A17DTS CDTI ecoFLEX I4 produced 128 hp (96 kW) at 4,000 rpm and 221 lb·ft (300 N·m) at 2,000-2,250 rpm; Transmissions: 6-speed GM 6T40 automatic; 5-speed manual; 6-speed manual. The Opel Mokka was introduced in 2012. Technical specs: Class: subcompact crossover sport utility vehicle; Body style: 5-door sport utility vehicle; Layout: front-engine, front-wheel drive or intelligent four-wheel-drive; Wheelbase: 100.6 in (2,555 mm); Length: 168.5 in (4,280 mm); Width: 69.9 in (1,775 mm); Height: 64.8 in (1,646 mm); Engines: 1.4L A14NET VVT MPI Turbo I4 produced 138 hp (103 kW) at 4,900-6,000 rpm and 148 lb·ft (200 N·m) at 1,850-4,900 rpm, 1.4L B14XFT VVT DI Turbo I4 produced 150 hp (112 kW) at 4,900-6,000 rpm and 173 lb·ft (235 N·m) at 1,850-4,900 rpm, 1.6L A16XER VVT MPI I4 produced 113 hp (85 kW) at 6,200 rpm and 114 lb·ft (155 N·m) at 4,000 rpm, 1.8L A18XER VVT MPI I4 produced 138 hp (103 kW) at 6,200 rpm and 131 lb·ft (178 N·m) at 3,800 rpm, 1.6L B16DTN CDTI ecoFLEX I4 produced 108 hp (81 kW) at 4,000 rpm rpm and 221 lb·ft (300 N·m) at 2,000-2,250 rpm, 1.6L B16DTH CDTI Turbo ecoFLEX I4 produced 134 hp (100 kW) at 3,500-4,000 rpm and 236 lb·ft (320 N·m) at 2,000-2,250 rpm, 1.7L A17DTS CDTI ecoFLEX I4 produced 128 hp (96 kW) at 4,000 rpm and 221 lb·ft (300 N·m) at 2,000-2,250 rpm; Transmissions: 6-speed GM 6T40 automatic; 5-speed manual; 6-speed manual. |
 2012-present Opel Mokka repair manual 2012-present Opel Mokka repair manual |
 2012-present Opel Mokka wiring diagrams 2012-present Opel Mokka wiring diagrams |
 Free Opel repair manuals Free Opel repair manuals |


