Drive mode Hyundai Santa Fe 2019 Owner’s Manual
I
IN
N S
ST
T R
R U
U M
M E
EN
N T
T
P
P A
A N
N E
EL
L
O
O V
VE
ER
R V
V I
IE
E W
W
(
( I
I)
)
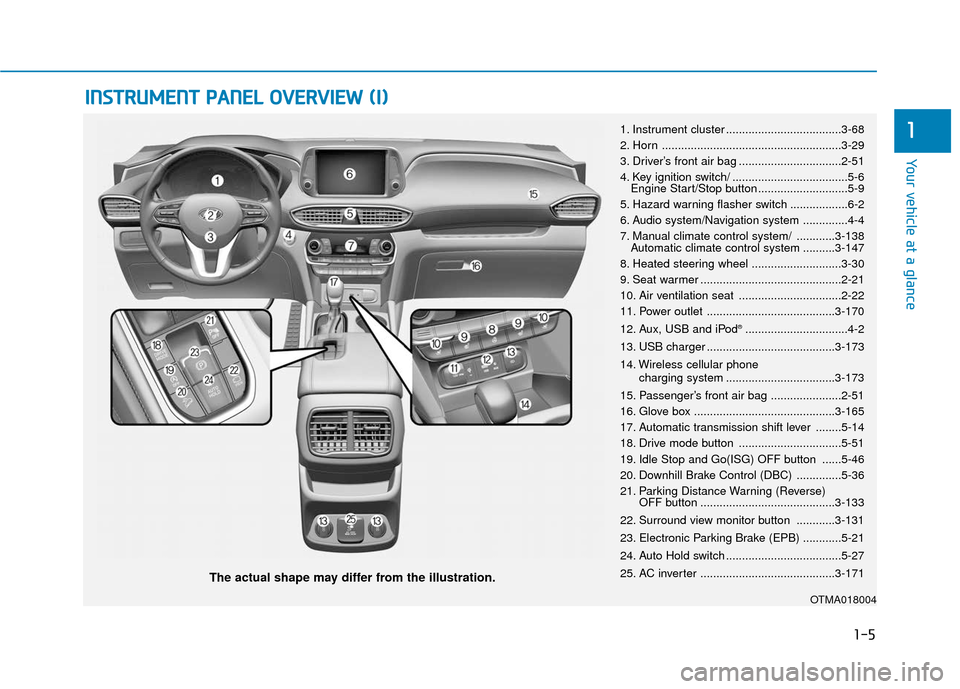
The actual shape may differ from the illustration.
1-5
Your vehicle at a glance
11. Instrument cluster . 3-68
2. Horn . 3-29
3. Driver’s front air bag . 2-51
4. Key ignition switch/ . 5-6
Engine Start/Stop button . 5-9
5. Hazard warning flasher switch . 6-2
6. Audio system/Navigation system . 4-4
7. Manual climate control system/ . 3-138 Automatic climate control system . 3-147
8. Heated steering wheel . 3-30
9. Seat warmer . 2-21
10. Air ventilation seat . 2-22
11. Power outlet . 3-170
12. Aux, USB and iPod
®. 4-2
13. USB charger . 3-173
14. Wireless cellular phone charging system . 3-173
15. Passenger’s front air bag . 2-51
16. Glove box . 3-165
17. Automatic transmission shift lever . 5-14
18. Drive mode button . 5-51
19. Idle Stop and Go(ISG) OFF button . 5-46
20. Downhill Brake Control (DBC) . 5-36
21. Parking Distance Warning (Reverse) OFF button . 3-133
22. Surround view monitor button . 3-131
23. Electronic Parking Brake (EPB) . 5-21
24. Auto Hold switch . 5-27
25. AC inverter . 3-171
OTMA018004
Page 48 of 557
2-30
Safety system of your vehicle
Rear Seat Belt – Passenger’s 3-point system with convertiblelocking retractor
This type of seat belt combines the
features of both an emergency locking
retractor seat belt and an automatic
locking retractor seat belt. Convertible
retractor type seat belts are installed in
the rear seat positions to help accom-
modate the installation of child
restraint systems. Although a convert-
ible retractor is also installed in the
front passenger seat position, NEVER
place any infant/child restraint system
in the front seat of the vehicle.
To fasten your seat belt:
Pull the seat belt out of the retractor
and insert the metal tab into the buck-
le. There will be an audible «click»
when the tab locks into the buckle.
When not securing a child restraint,
the seat belt operates in the same way
as the driver’s seat belt (Emergency
Locking Retractor Type). It automati-
cally adjusts to the proper length only
after the lap belt portion of the seat
belt is adjusted manually so that it fits
snugly across your hips.
When the seat belt is fully extended
from the retractor to allow the installa-
tion of a child restraint system, the
seat belt operation changes to allow
the belt to retract, but not to extend
(Automatic Locking Retractor Type).
Refer to the «Using a Child Restraint
System» section in this chapter. Although the seat belt retractor
provides the same level of protec-
tion for seated passengers in
either emergency or automatic
locking modes, the emergency
locking mode allows seated pas-
sengers to move freely in their
seat while keeping some tension
on the belt. During a collision or
sudden stop, the retractor auto-
matically locks the belt to help
restrain your body.
To deactivate the automatic lock-
ing mode, unbuckle the seat belt
and allow the belt to fully retract.
NOTICE
Page 69 of 557
2-51
Safety system of your vehicle
2
Where Are the Air Bags?
Driver’s and passenger’s frontair bags
Your vehicle is equipped with a
Advanced Supplemental Restraint
System (SRS) and lap/shoulder belts
at both the driver and passenger
seating positions.
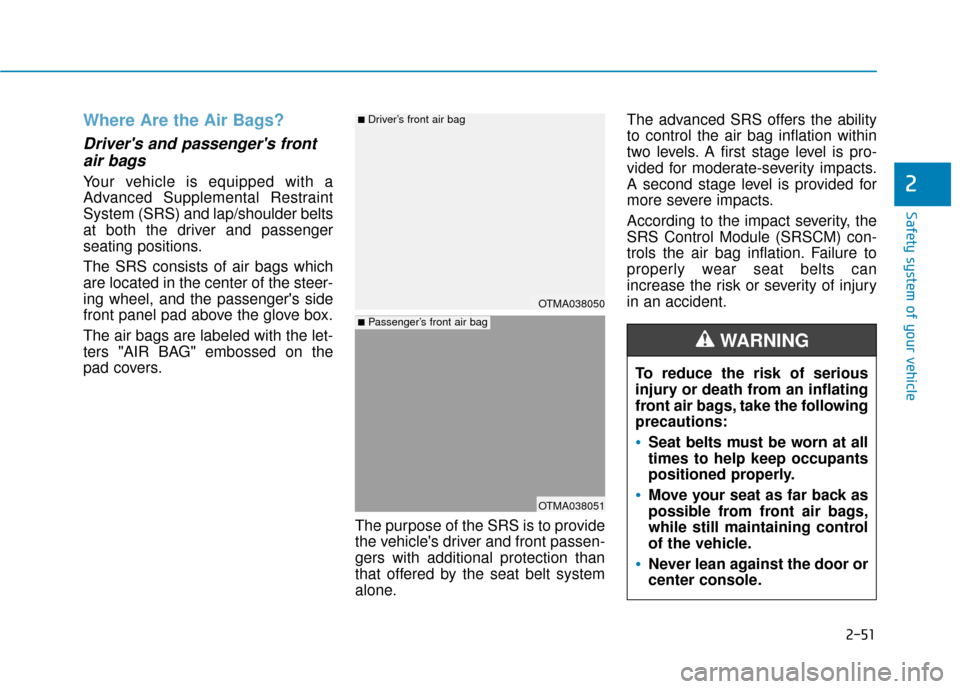
The SRS consists of air bags which
are located in the center of the steer-
ing wheel, and the passenger’s side
front panel pad above the glove box.
The air bags are labeled with the let-
ters «AIR BAG» embossed on the
pad covers.
The purpose of the SRS is to provide
the vehicle’s driver and front passen-
gers with additional protection than
that offered by the seat belt system
alone.The advanced SRS offers the ability
to control the air bag inflation within
two levels. A first stage level is pro-
vided for moderate-severity impacts.
A second stage level is provided for
more severe impacts.
According to the impact severity, the
SRS Control Module (SRSCM) con-
trols the air bag inflation. Failure to
properly wear seat belts can
increase the risk or severity of injury
in an accident.
OTMA038051
OTMA038050
■Passenger’s front air bag
■Driver’s front air bag
To reduce the risk of serious
injury or death from an inflating
front air bags, take the following
precautions:
Seat belts must be worn at all
times to help keep occupants
positioned properly.
Move your seat as far back as
possible from front air bags,
while still maintaining control
of the vehicle.
Never lean against the door or
center console.
WARNING
Page 91 of 557
LCD Display . 3-93
LCD Display Control . 3-93
LCD Display Modes . 3-94
Trip Computer . 3-108
Head Up Display (HUD). 3-112
Lighting. 3-114
Exterior Lights . 3-114
Interior Lights . 3-122
Welcome System . 3-125
Wipers And Washers . 3-126
Front Windshield Wipers . 3-126
Front Windshield Washers . 3-128
Rear Window Wiper and Washer. 3-129
Driver Assist System . 3-130
Rear View Monitor . 3-130
Surround View Monitoring . 3-131
Parking Distance Warning (Reverse) System . 3-133
Manual Climate Control System. 3-138
Heating and Air Conditioning . 3-139
System Operation . 3-143
System Maintenance. 3-145
Automatic Climate Control System . 3-147
Automatic Temperature Control Mode . 3-148
Manual Temperature Control Mode . 3-149System Operation . 3-156
System Maintenance. 3-157
Windshield Defrosting and Defogging . 3-159
Auto Defogging System . 3-161
Rear Window Defroster . 3-163
Climate Control Additional Features . 3-164
Cluster ionizer . 3-164
Automatic Ventilation . 3-164
Sunroof Inside Air Recirculation . 3-164
Storage Compartment . 3-165
Center Console Storage . 3-165
Glove Box . \
3-165
Sunglass Holder. 3-166
Tray. \
. 3-166
Luggage Tray . 3-167
Interior Features . 3-168
Ashtray . \
. 3-168
Cup Holder . 3-\
168
Sunvisor . \
. 3-169
Power Outlet . 3-170
AC Inverter. 3-\
171
USB Charger . 3-173\
Wireless Cellular Phone Charging System. 3-173
Clock . \
. 3-175
Coat Hook . 3\
-176
3
Page 93 of 557
3-4
Convenient features of your vehicle
Remote Key (if equipped)
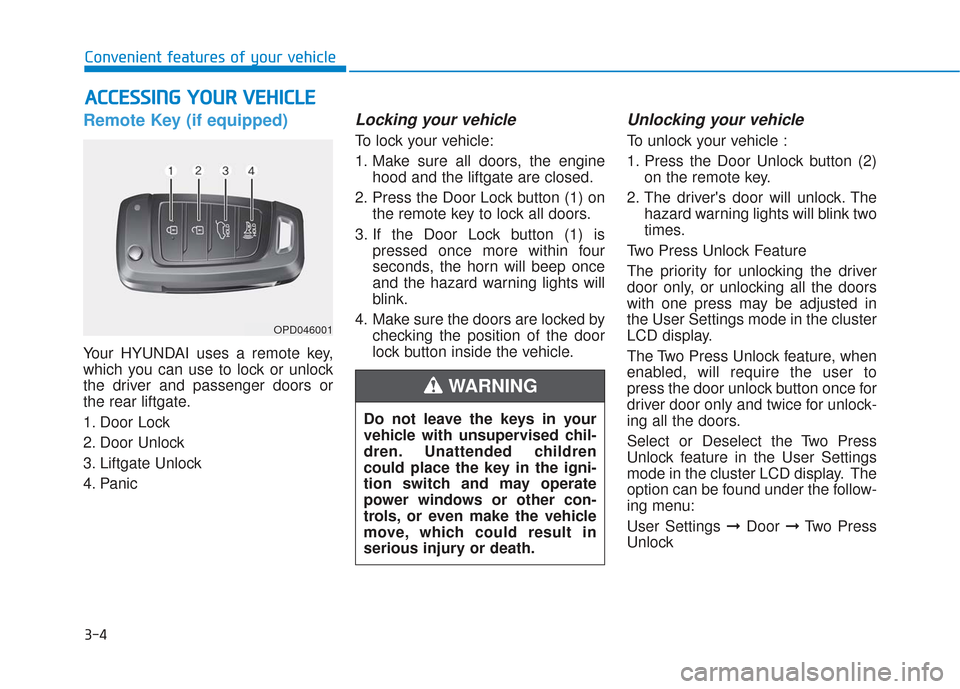
Your HYUNDAI uses a remote key,
which you can use to lock or unlock
the driver and passenger doors or
the rear liftgate.
1. Door Lock
2. Door Unlock
3. Liftgate Unlock
4. Panic
Locking your vehicle
To lock your vehicle:
1. Make sure all doors, the enginehood and the liftgate are closed.
2. Press the Door Lock button (1) on the remote key to lock all doors.
3. If the Door Lock button (1) is pressed once more within four
seconds, the horn will beep once
and the hazard warning lights will
blink.
4. Make sure the doors are locked by checking the position of the door
lock button inside the vehicle.
Unlocking your vehicle
To unlock your vehicle :
1. Press the Door Unlock button (2)on the remote key.
2. The driver’s door will unlock. The hazard warning lights will blink two
times.
Two Press Unlock Feature
The priority for unlocking the driver
door only, or unlocking all the doors
with one press may be adjusted in
the User Settings mode in the cluster
LCD display.
The Two Press Unlock feature, when
enabled, will require the user to
press the door unlock button once for
driver door only and twice for unlock-
ing all the doors.
Select or Deselect the Two Press
Unlock feature in the User Settings
mode in the cluster LCD display. The
option can be found under the follow-
ing menu:
User Settings ➞ Door ➞Two Press
Unlock
A A C
CC
CE
E S
SS
SI
IN
N G
G
Y
Y O
O U
UR
R
V
V E
EH
H I
IC
C L
LE
E
OPD046001
Do not leave the keys in your
vehicle with unsupervised chil-
dren. Unattended children
could place the key in the igni-
tion switch and may operate
power windows or other con-
trols, or even make the vehicle
move, which could result in
serious injury or death.
WARNING
Page 98 of 557
3-9
Convenient features of your vehicle
3
Two Press Unlock Feature
The priority for unlocking the driver
door only, or unlocking all the doors
with one press may be adjusted in
the User Settings mode in the cluster
LCD display.
The Two Press Unlock feature, when
enabled, will require the user to
press the door unlock button once for
driver door only and twice for unlock-
ing all the doors.
Select or Deselect the Two Press
Unlock feature in the User Settings
mode in the cluster LCD display. The
option can be found under the follow-
ing menu:
User Settings ➞Door ➞Two Press
Unlock The Two Press Unlock feature can
also be enabled or disabled by
pressing the door lock and unlock
buttons simultaneously on the Key
FOB:
Press and hold both the Door Lock
button and the Door Unlock button
simultaneously until the hazard
warning lights blink.
This will enable or disable the Two
Press Unlock feature. Repeat this
procedure to enable/disable the
mode again.
Information
• The door handle buttons will only
operate when the smart key is with-
in 28-40 inches (0.7~1m) from the
outside door handle
• Either the driver or front passenger door can be opened with the door
handle button when the smart key
is within this range
• If you press the front passenger outside door handle with the smart
key in your possession, all the doors
will unlock
Opening the liftgate
Non-power liftgate
To unlock and open the liftgate:
1. Make sure you have the smart keyin your possession.
2. Press either the liftgate handle release switch on the vehicle or
press and hold the Liftgate Unlock
button on the smart key for more
than one second. The hazard
warning lights will blink two times
and the liftgate latch will unlock.
3. Once the liftgate is opened and then closed, the liftgate will auto-
matically re-lock after 30 seconds.
Information
• The liftgate handle switch will onlyoperate when the smart key is with-
in 28 inches (0.7 m) from the lift-
gate handle.
• The Liftgate Unlock button (3) will only unlock the liftgate. It will not
release the latch and open the lift-
gate automatically. If the Liftgate
Unlock button is used, someone
must still press the liftgate handle
switch to open the liftgate.
i
i
Page 99 of 557
3-10
Convenient features of your vehicle
Power liftgate
To unlock and open the liftgate:
1. Make sure you have the smart keyin your possession.
2. Press either the liftgate handle release switch on the vehicle or
press and hold the Liftgate Unlock
button on the smart key for more
than one second. The hazard
warning lights will blink two times
and the liftgate latch will open.
3. Once the liftgate is opened and then closed, the liftgate will auto-
matically re-lock after 30 seconds.
Information
The liftgate handle switch will only
operate when the smart key is within
28 inches (0.7 m) from the liftgate
handle.
Panic button
Press and hold the Panic button (4)
for more than one second. The horn
sounds and hazard warning lights
blink for about 30 seconds. To cancel
the panic mode, press any button on
the Smart Key.
Start-up
You can start the vehicle without
inserting the key.
For information, refer to the
«Engine Start/Stop Button» sec-
tion in chapter 5.
To prevent damaging the smart key:
Keep the smart key in a cool, dryplace to avoid damage or mal-
function. Exposure to moisture
or high temperature may cause
the internal circuit of the smart
key to malfunction which may
not be covered under warranty.
Avoid dropping or throwing the smart key.
Protect the smart key from extreme temperatures.
Mechanical key
If the Smart Key does not operate
normally, you can lock or unlock the
driver’s door by using the mechanical
key.
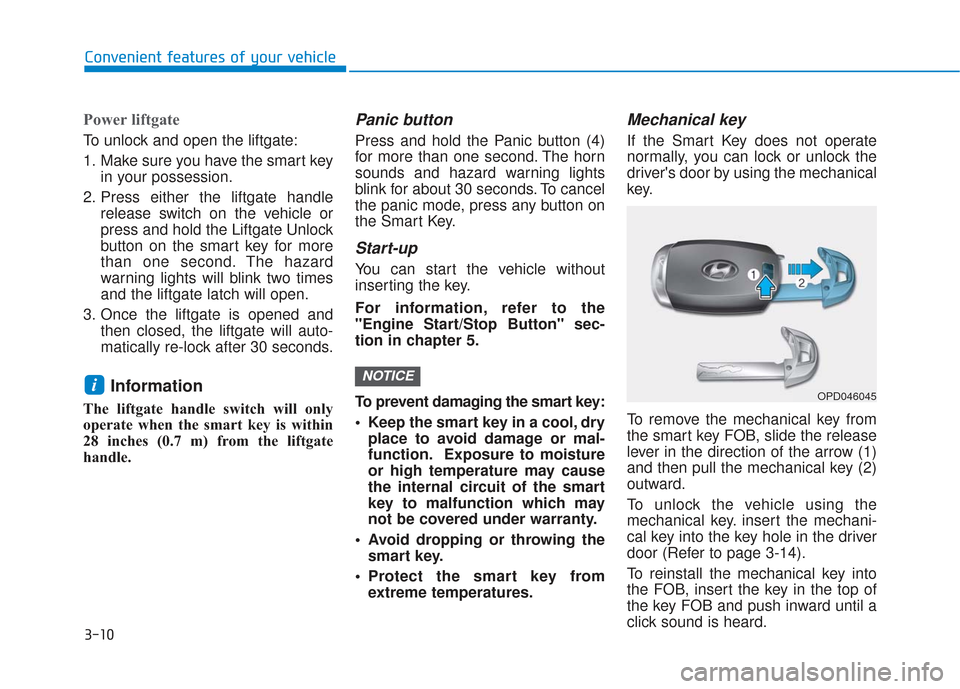
To remove the mechanical key from
the smart key FOB, slide the release
lever in the direction of the arrow (1)
and then pull the mechanical key (2)
outward.
To unlock the vehicle using the
mechanical key. insert the mechani-
cal key into the key hole in the driver
door (Refer to page 3-14).
To reinstall the mechanical key into
the FOB, insert the key in the top of
the key FOB and push inward until a
click sound is heard.
NOTICEiOPD046045
Page 104 of 557
3-15
Convenient features of your vehicle
3
Smart key
Press the button on the driver’s out-
side door handle while carrying the
Smart Key with you or press theDoor Unlock button on the Smart
Key, the driver’s door will unlock.
If you press the button on the front
passenger’s outside door, all doors
will unlock.
Once the doors are unlocked, they
may be opened by pulling the door
handle.
When closing the door, push the
door by hand. Make sure that doors
are closed securely.
Information
• In cold and wet climates, door lock
and door mechanisms may not
work properly due to freezing con-
ditions.
• If the door is locked/unlocked mul- tiple times in rapid succession with
either the vehicle key or door lock
switch, the system may stop operat-
ing temporarily in order to protect
the circuit and prevent damage to
system components.
• Two press unlock setting can be changed in the User Settings mode
on the cluster.
Operating Door Locks from
Inside the Vehicle
With the door lock button
To unlock a door, push the doorlock button (1) to the «Unlock»
position. The red mark (2) on the
door lock button will be visible.
To lock a door, push the door lock button (1) to the «Lock» position. If
the door is locked properly, the red
mark (2) on the door lock button
will not be visible.
To open a door, pull the door han- dle (3) outward.
iOTM048000
OPD046004
Door
UnlockDoor Lock
L
L
L
L
o
o
o
o
c
c
c
c
k
k
k
k
Page 110 of 557
3-21
Convenient features of your vehicle
3
However if you press the switch
within 10 seconds after the warn-
ing message appears (the indica-
tor on the switch will turn off), the
system judges that the driver
unlocked the door acknowledging
the rear status and released
regardless of the rear status.
3. When an approaching vehicle from the rear is detected the
moment the door is opened, the
«Watch for traffic» warning mes-
sage appears on the cluster and a
warning sounds.
The above 2 and 3 functions are activated when you select ‘Driver
Assistance →Blind-Spot Safety →
Safe Exit Assistance (SEA)’ from
the User Settings mode in the clus-
ter LCD display. The Electronic child safety lock
system will operate for approxi-
mately 10 minutes after the ignition
key is removed or turned to the
LOCK (or OFF) position. After
about 10 minutes, the indicator on
the switch turns off and you cannot
deactivate the Electronic child
safety lock system. To deactivate
the Electronic child safety lock sys-
tem, press the Electronic child safe-
ty lock switch again with the ignition
switch in the ON position or after
starting the engine.
When the power is supplied again after removing the battery or bat-
tery discharge while the child safe-
ty lock is in the lock position, press
the child safety lock switch once
again to match the state of the indi-
cator on the child safety lock switch
and actual status of the Electronic
child safety lock system.
If the airbag is activated while the child safety lock switch is ON (the
indicator on the switch illuminates)
it automatically switches OFF and
the rear door is unlocked.
The Safe Exit Assist (SEA)
system may not operate nor-
mally if there is any vehicle or
obstacle at the rear area of
your vehicle.
The Safe Exit Assist (SEA)
system may not operate nor-
mally when a vehicle is com-
ing rapidly two lanes over
from your vehicle or a vehicle
is approaching at a fast speed
from the rear in the lane next
to your vehicle.
The Safe Exit Assist (SEA)
system may be activated later
than normal or may not oper-
ate normally if a vehicle is
approaching fast from the rear
of your vehicle.
CAUTION
Page 111 of 557
3-22
Convenient features of your vehicle
Rear Occupant Alert (ROA)
System (if equipped)
The Rear Occupant Alert (ROA) sys-
tem is provided to help prevent exit-
ing the vehicle with the rear passen-
ger left in the vehicle.
• 1st alert- When you open the front doorafter opening and closing the rear
door and turning off the engine,
the “Check rear seats” warning
message appears on the cluster.
2nd alert — After the 1st alert the 2nd alertoperates when any movement is
detected in the vehicle after the
driver’s door is closed and all the
doors are locked. The horn will
activate for about 25 seconds. If
the system continues to detect a
movement the alert operates up
to 8 times.
— Unlock the door with the remote key or smart key to stop the alert.
— The system detects movement in the vehicle for 24 hours after the
door is locked. The 2nd alert is activated only after
the prior activation of the 1st alert.
You can activate or deactivate the Rear Occupant Alert (ROA) sys-
tem from the User Settings mode
in the cluster LCD display. The
option can be found under the fol-
lowing menu:
User Settings → Convenience →
Rear Seat Alert
•The Safe Exit Assist (SEA)
system will not operate if
there is a malfunction with the
Blind-Spot Collision Warning
(BCW) system as follows:
— When the BCW warning message appears
When the BCW sensor or
the sensor surrounding is
polluted or covered
— When the BCW does not warn or warns wrongly
For more details, refer to cau-
tions and limitations in «Blind-
Spot Collision Warning (BCW)»
in chapter 5.
The system does not detect
every obstacle approaching
the vehicle exit.
The driver and passenger are
responsible for any obstacles
while exiting the vehicle.
Always check the surrounding
before you exit the vehicle.
WARNING
