- Installation
- Video Tutorial
- Game/Mod not listed?
- Note
- Unofficial games or mods tested
- Configuring Hammer for Half-Life: Source
- Contents
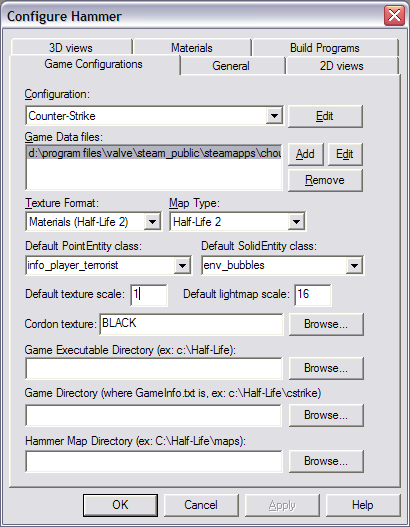
- Game Configurations
- Configuration
- Game Data Files
- Default PointEntity class
- Default SolidEntity class
- Cordon texture
- Game Executable Directory
- Game Directory
- VMF Directory
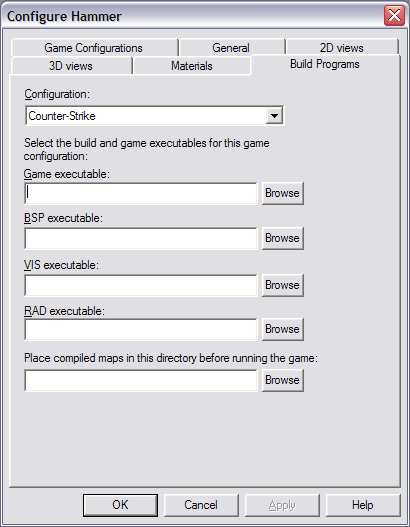
- Build Programs
- Game Executable
- BSP executable
- VIS executable
- RAD executable
- Compiled Map Directory
- Hammer Manual Configuration/ru
- Contents
- Сперва прочтите это!
- Добавление новой Игровой Конфигурации
- Настройка игровой директории и основных параметров
- Настройка Build Programs
Installation
To update Hammer++ if you had it already installed, download the new version, then simply drag and drop the files over your existing install. When you are asked to overwrite any files, click yes.
Video Tutorial

Game/Mod not listed?
You might still be able to use Hammer++ with it. If it’s a multiplayer game or mod, use the Source SDK 2013 Multiplayer download. For singleplayer, try the Source SDK 2013 Singleplayer download.
Note
Some Windows versions have an issue where the File Open dialog will freeze Hammer++. As a workaround, open hammerplusplus_settings.ini in Notepad and set FileDialogHack to false.


Unofficial games or mods tested
- Garry’s Mod: Community-made Tutorial.
- Portal 2: Works under CSGO version. Must be installed onto CSGO and game configuration pointed to Portal 2 assets. Community-made Tutorial.
- Left 4 Dead 2 : Half-works under CSGO version. Same method as Portal 2. Certain models will be shown as ERROR s.
- Mapbase: Works using SDK 2013 Singleplayer version.
- Momentum Mod: Likely to work using CSGO version.

Hammer++ is not affiliated with Valve Corporation. Like or enjoy my work? Support me on Ko-fi.
Configuring Hammer for Half-Life: Source
After the SteamPipe update in 2013, Half-Life: Source now installs in Half-Life 2 directory. However, a Hammer configuration does not ship, nor does an FGD file. Half-Life Source.fgd is required for this process.
Note: Most of this process is the same for Half-Life Deathmatch: Source , although paths will be different.
Contents
- 1 Game Configurations
- 1.1 Configuration
- 1.2 Game Data Files
- 1.3 Default PointEntity class
- 1.4 Default SolidEntity class
- 1.5 Cordon texture
- 1.6 Game Executable Directory
- 1.7 Game Directory
- 1.8 VMF Directory
- 2.1 Game Executable
- 2.2 BSP executable
- 2.3 VIS executable
- 2.4 RAD executable
- 2.5 Compiled Map Directory
Game Configurations


Launch Hammer. Hammer will be installed with Half-Life 2, and can be found at common\Half-Life 2\bin\hammer.exe . Click on Tools, Options. to open the configuration window. Go to the tab labeled Game Configurations.
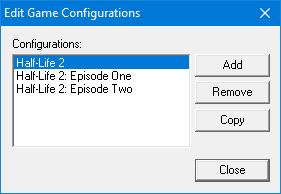
Configuration
Hammer allows you to setup multiple configurations, so if you want to make maps for more than one game, you can make maps for each on the same editor. This section allows you to add, remove, or edit different configurations.
Click Edit (the wide one at the top, not the smaller one below), Add, and name your configuration whatever you want. Click OK, Close.
Game Data Files
Copy the text from Half-Life Source.fgd into a Notepad document, save it as halflifesource.fgd in common\Half-Life 2\bin .
Click Add. Select the file at common\Half-Life 2\bin . You can select and use extra FGDs, but anything in them not coded to work in Half-Life: Source will not work. For example: HL2 entities.
Note: ALL filepaths you enter for configurations need to be absolute, meaning they start with the drive letter Steam is installed on and include the full path to the folder or file.
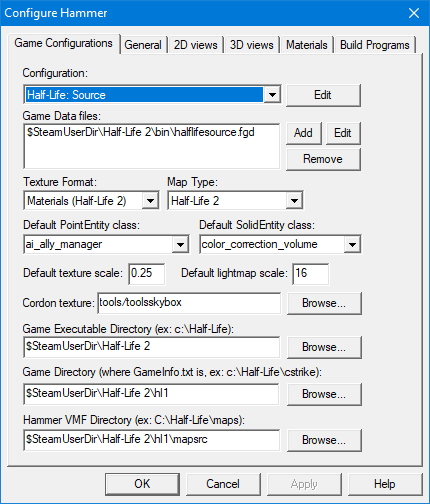
The Texture Format option should now say Materials (Half-Life 2) and the Map Type option should now say Half-Life 2. These should be the only options listed for either.
Default PointEntity class
By default, Hammer automatically selects ai_ally_manager from the entity list when using the Entity Tool, because it is alphabetically first. You can change the default to any valid point entity you want. info_player_start is recommended.
Default SolidEntity class
By default, Hammer to automatically select color_correction_volume from the entity list when you tie a brush to an entity, because it is alphabetically first. You can change the default to any valid brush entity you want. func_detail is recommended.
Cordon texture
Set this to tools\toolsskybox . An alternative is BLACK .
Game Executable Directory
This is the folder containing hl2.exe. Select the folder common\Half-Life 2 .
Game Directory
This is the folder holding game-specific files, such as models, animations, textures, etc. For Half-Life: Source, this is at common\Half-Life 2\hl1 .
VMF Directory
This is where Hammer will save all files related to your map every time you compile. The engine looks in common\Half-Life 2\[your game folder]\maps for maps, however, Hammer will generate quite a few files related to your map when saving or compiling, so you may find it preferable to have a separate folder to contain them all (usually named mapsrc ). Compiled map files can be stored in another folder, which we will get to configuring near the end.
Build Programs
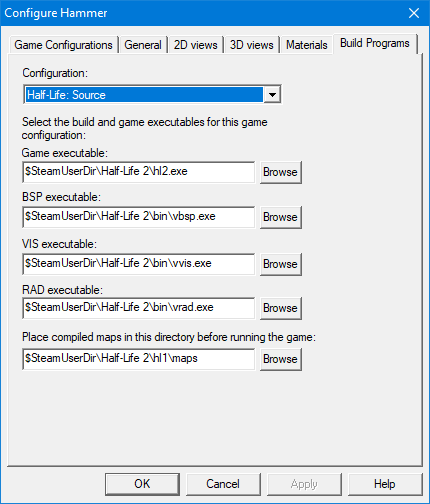
Now go to the tab labeled Build Programs. These are the programs that process your level geometry, determine where to optimize for visibility, and add lighting to your map. Many mappers use fan made modifications of the original tools developed for Source containing many fixes and improvements. If you use those tools, you will have to give filepaths for those instead of the ones talked about below.
Game Executable
A .exe file to open when the map finishes compiling. Unless you have some non-gaming purpose for Hammer, this should probably be common\Half-Life 2\hl2.exe .
BSP executable
BSP generates visleafs. This is at common\Half-Life 2\bin\vbsp.exe .
VIS executable
VIS determines what is visible from within each visleaf, which is used to save RAM for computers. This is at common\Half-Life 2\bin\vvis.exe .
RAD executable
RAD adds unchanging and toggleable lighting into your map, so it won’t look so flat and boring. Dynamic lighting, like the HEV flashlight, is done directly in the game. This is at common\Half-Life 2\bin\vrad.exe .
Compiled Map Directory
This is where the game usually looks for maps. This should be common\Half-Life 2\hl1\maps .
Hammer Manual Configuration/ru
Эта подстраница используется на странице Hammer Manual Configuration для отображения содержимого на русский (Russian).
Если вы внесли изменения в языковую подстраницу, не забудьте очистить основную страницу, нажав на кнопку справа. В противном случае её содержимое не обновится.
Contents
Сперва прочтите это!
При первом запуске, Hammer не настраивается автоматически после установки Source SDK. Вы можете выполнить следующие шаги, чтобы настроить его вручную. Если вы уже пытались настраивать его, настоятельно рекомендуем вам сперва попытаться исправить конфигурацию, следуя инструкция описанным в статье Сбрасывание Source SDK Game Configuration.
Предупреждение: В большинстве случаев, Hammer настроит себя и вам не потребуется выполнять эту процедуру. Если у вас есть проблемы, это намного проще, чем Сбрасывание Source SDK Game Configuration. Однако, это приведет к удалению всех настроек для ваших модов
Добавление новой Игровой Конфигурации
- Запустите Hammer через Source SDK Launcher.
- Когда вы увидите диалоговое окно First Time Setup, нажмите на кнопкуNo’:

- Должен появится диалог Configure Hammer.
 Если этого не произошло, выбрите Options из меню Tools, и затем выберите вкладку Game Configurations.
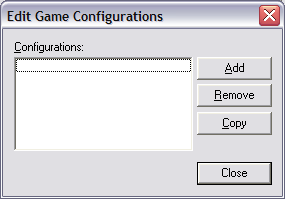
 - Нажмите на верхнюю кнопку Edit, затем на выпадающий список Configuration . Появится диалоговое окно Edit Game Configurations:

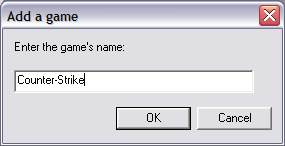
- Нажмите на кнопку Add. Откроется диалог Add a game :

- Введите «Counter-Strike», «cstrike», «Half-Life 2», «HL2DM» или эквивалентные названия вашей конфигурации или вашего мода. Это название будет отображаться в Source SDK Launcher в поле Current Game. Точность названия не имеет значения, важно, чтобы оно имело смысл для вас. Нажмите OK, чтобы подтвердить свой выбор и закрыть диалоговое окно.
- Нажмите на кнопку Close в диалоге Edit Game Configurations.
Настройка игровой директории и основных параметров
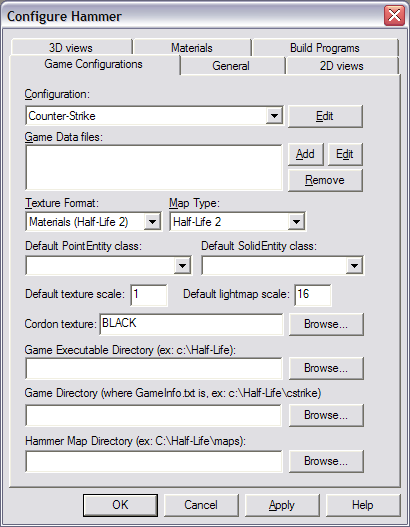
- Теперь вы должны вернуться в диалог Configure Hammer с входом в выпадающий лист Configuration:
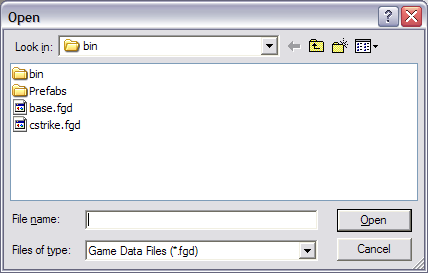
- Нажмите Add справа от списка файлов Game Data. Появится диалог Open:

- Откройте соответствующий .FGD файл для вашей конфигурации:
- Для конфигурации Counter-Strike: Source выберите cstrike.fgd и нажмите на кнопку Open.
- Для конфигурации Half-Life 2 выберите halflife2.fgd и нажмите на кнопку Open.
- Для конфигурации Half-Life 2 Deathmatch выберите hl2mp.fgd и нажмите на кнопку Open.
- Вы вернетесь в диалог Configure Hammer с этими заполненными полями:
- Напишите 0.25 в поле Default texture scale. Напишите tools\toolsskybox в поле Cordon texture.
- Под Game Executable Directory, нажмите Browse и укажите путь к игре. Для примера: C:\Program Files\Valve\Steam\SteamApps\username\counter-strike source Где username — ваш логин в Steam. Используйте следующее для модификаций: $SteamUserDir\half-life 2
- Скопируйте то, что вы ввели в Game Executable Directory, затем вставьте это в Game Directory, и добавьте игровую директорию в конец. Игровая директория для Counter-Strike — \cstrike . Для Half-Life 2 — \hl2 . Для Half-Life 2 Deathmatch — \hl2mp .
- Пример: Для конфигурации Counter-Strike, ваша Game Directory должна быть:
C:\Program Files\Valve\Steam\SteamApps\username\counter-strike source\cstrike
- Для Half-Life 2, ваша Game Directory должна быть:
C:\Program Files\Valve\Steam\SteamApps\username\half-life 2\hl2
- Для Half-Life 2 Deathmatch, ваша Game Directory должна быть:
C:\Program Files\Valve\Steam\SteamApps\username\half-life 2 deathmatch\hl2mp Опять же, где username — ваш логин в Steam.
- Для Мода, ваша Game Directory будет:
$SteamDir\steamapps\SourceMods\MODDIRMODDIR это название игровой директории вашего мода.
- Под Hammer Map Directory, вы должны ввести путь, где вы храните исходные файл карт .VMF. Используя Source SDK Структура Файлов и Директорий, вам необходимо ввести соответствующую mapsrc директорию:
- Пример для Counter-Strike:
C:\Program Files\Valve\Steam\SteamApps\username\sourcesdk_content\cstrike\mapsrc
- Пример для Half-Life 2:
C:\Program Files\Valve\Steam\SteamApps\username\sourcesdk_content\hl2\mapsrc
- Пример для Half-Life 2 Deathmatch:
C:\Program Files\Valve\Steam\SteamApps\username\ sourcesdk_content\hl2mp\mapsrc
- Пример для Модификации:
Это директория в которой вы работаете
Настройка Build Programs
- Нажмите на вкладку Build Programs:
- Скопируйте и вставьте в Game executable Directory то, что вы ввели во вкладку Game Configurations ранее, затем добавьте \hl2.exe в конец.
- Пример: Для конфигурации Counter-Strike, ваша Game Executable должна быть:
$SteamUserDir\counter-strike source\hl2.exe
- Для Half-Life 2 configuration, ваша Game Executable должна быть:
$SteamUserDir\half-life 2\hl2.exe
- Для Half-Life 2 Deathmatch configuration, ваша Game Executable должна быть:
$SteamUserDir\half-life 2 deathmatch\hl2.exe
- Для BSP executable, введите путь к vbsp.exe : Orange Box: $SteamUserDir\sourcesdk\bin\orangebox\bin\vbsp.exe Ep1 Engine: $SteamUserDir\sourcesdk\bin\ep1\bin\vbsp.exe
- Для VIS executable, введите путь к vvis.exe : Orange Box: $SteamUserDir\sourcesdk\bin\orangebox\bin\vvis.exe Ep1 Engine: $SteamUserDir\sourcesdk\bin\ep1\bin\vvis.exe
- Для RAD executable, введите путь к vrad.exe : Orange Box: $SteamUserDir\sourcesdk\bin\orangebox\bin\vrad.exe Ep1 Engine: $SteamUserDir\sourcesdk\bin\ep1\bin\vrad.exe
- Для Place compiled maps in this directory before running the game, добавьте \maps в конец Game Directory:
- Пример для Counter-Strike:
$SteamUserDir\counter-strike source\cstrike\maps
- Пример для Half-Life 2:
$SteamUserDir\half-life 2\hl2\maps
- Пример для Half-Life 2 Deathmatch:
$SteamUserDir\half-life 2 deathmatch\hl2mp\maps
- Пример для Модификации:
$SteamDir\steamapps\SourceMods\MODDIR\maps MODDIR это название игровой директории вашего мода.
- Нажмите OK. Hammer настроен для использования.